3.11 Setting up your MDM system
MyID allows you to work with Mobile Device Management (MDM) systems. See section 2.3, Supported Mobile Device Management integration for details of which systems are supported.
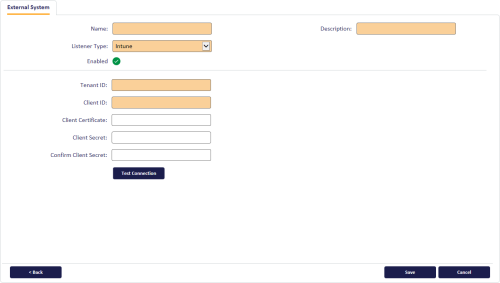
3.11.1 Setting up an external system for Intune
For full details of how to use derived credentials in Microsoft Intune, see the Microsoft documentation:
docs.microsoft.com/en-us/intune/protect/derived-credentials
To set up an external system that allows you to connect to Microsoft Intune:
-
From the Configuration category, select External Systems.
You can also launch this workflow from the Connections and Notifications section of the More category in the MyID Operator Client. See the Using Connections and Notifications workflows section in the MyID Operator Client guide for details.
-
Click New.
-
From the Listener Type drop-down list, select Intune.
The Microsoft Intune options appear:
-
Set the following options:
-
Name – Type a name for the external system.
-
Description – Type a description for the external system.
-
Enabled – Set this option to enable the Intune connector. You can disable the connector and MyID will not attempt to communicate with the Intune system.
-
Tenant ID – Type the Tenant ID of the subscription in which you are running your Intune environment.
-
Client ID – Type the Application (client) ID of the registered application entry connected to your Azure subscription.
See the following Microsoft guide for details of creating an app registration for the MyID MDM connector:
docs.microsoft.com/en-us/azure/active-directory/develop/quickstart-register-app
The registered application must have the following Microsoft Graph permission:
DeviceManagementManagedDevices.Read.All
-
Client Certificate – You can authenticate using either a client certificate or a client secret.
If you are authenticating using a client certificate, you must generate or import a certificate on the application server within the Personal certificate store of the MyID COM+ user account. Save the public certificate to a location on the application server, and register it as an authentication certificate against the API in the Azure portal.
Type the path to the certificate file on the application server in the Client Certificate field.
-
Client Secret – If you are authenticating using a client secret, type the secret you have created in the Azure portal, then type it again in the Confirm Client Secret field.
-
-
Click Test Connection to check that you have entered the details correctly.
-
Click Save.
-
Restart the Edefice_BOL component to ensure that MyID is working with the updated configuration.
To restart the component:
-
On the MyID application server, open Windows Component Services.
-
Expand Component Services > Computers > My Computer > COM+ Applications.
-
Right-click Edefice_BOL, then from the pop-up menu click Shut down.
The component will restart automatically the next time it is needed.
-

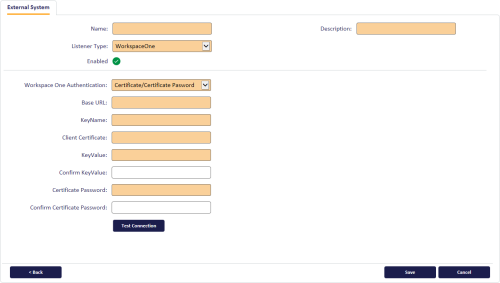
3.11.2 Setting up an external system for Workspace ONE
To set up an external system that allows you to connect to VMWare Workspace ONE:
-
From the Configuration category, select External Systems.
You can also launch this workflow from the Connections and Notifications section of the More category in the MyID Operator Client. See the Using Connections and Notifications workflows section in the MyID Operator Client guide for details.
-
Click New.
-
From the Listener Type drop-down list, select WorkspaceOne.
The Workspace ONE options appear:
-
From the Workspace One Authentication drop-down list, select one of the following:
-
Certificate/Certificate Password – Select this option if you are using Certificate authentication for the Workspace ONE system. The Client Certificate and Certificate Password fields are now available.
-
User/password authentication – Select this option if you are using Basic authentication for the Workspace ONE system. The Username and Password fields are now available.
-
-
Set the following options:
-
Name – Type a name for the external system.
-
Description – Type a description for the external system.
-
Enabled – Set this option to enable the Workspace ONE connector. You can disable the connector and MyID will not attempt to communicate with the Workspace ONE system.
-
Base URL – Type the URL of the Workspace ONE installation. Use the following form:
https://*****.awmdm.com
-
KeyName – Type the name of the API key configured for the Workspace ONE REST API; this is usually:
aw-tenant-code
-
KeyValue – Type the value of the API key, then type it again in the Confirm KeyValue field.
-
Username – If you selected User/password authentication from the Workspace One Authentication drop-down list, type the name of the configured account.
-
Password – Type the password for the configured account, then type it again in the Confirm Password field.
-
Client Certificate – If you selected Certificate/Certificate Password from the Workspace One Authentication drop-down list, provide the path and filename for the PFX file containing the client certificate generated for the admin account and exported from the Workspace ONE system. This must be present on the application server; for example:
C:\VMWare\Workspace ONE API\CN=23764_td.username.p12
-
Certificate Password – type the certificate password, then type it again in the Confirm Certificate Password field.
-
-
Click Test Connection to check that you have entered the details correctly.
-
Click Save.
-
Restart the Edefice_BOL component to ensure that MyID is working with the updated configuration.
To restart the component:
-
On the MyID application server, open Windows Component Services.
-
Expand Component Services > Computers > My Computer > COM+ Applications.
-
Right-click Edefice_BOL, then from the pop-up menu click Shut down.
The component will restart automatically the next time it is needed.
-

3.11.2.1 Configuring Workspace ONE for the PIV-D application
You must configure Workspace ONE for the PIV-D application.
You must configure the ConnectorDeviceIdentifier configuration key in the Application Configuration screen as follows:
|
Configuration Key |
Value Type |
Configuration Value |
|---|---|---|
|
ConnectorDeviceIdentifier |
String |
{DeviceUid} |
See your VMWare documentation for more information.
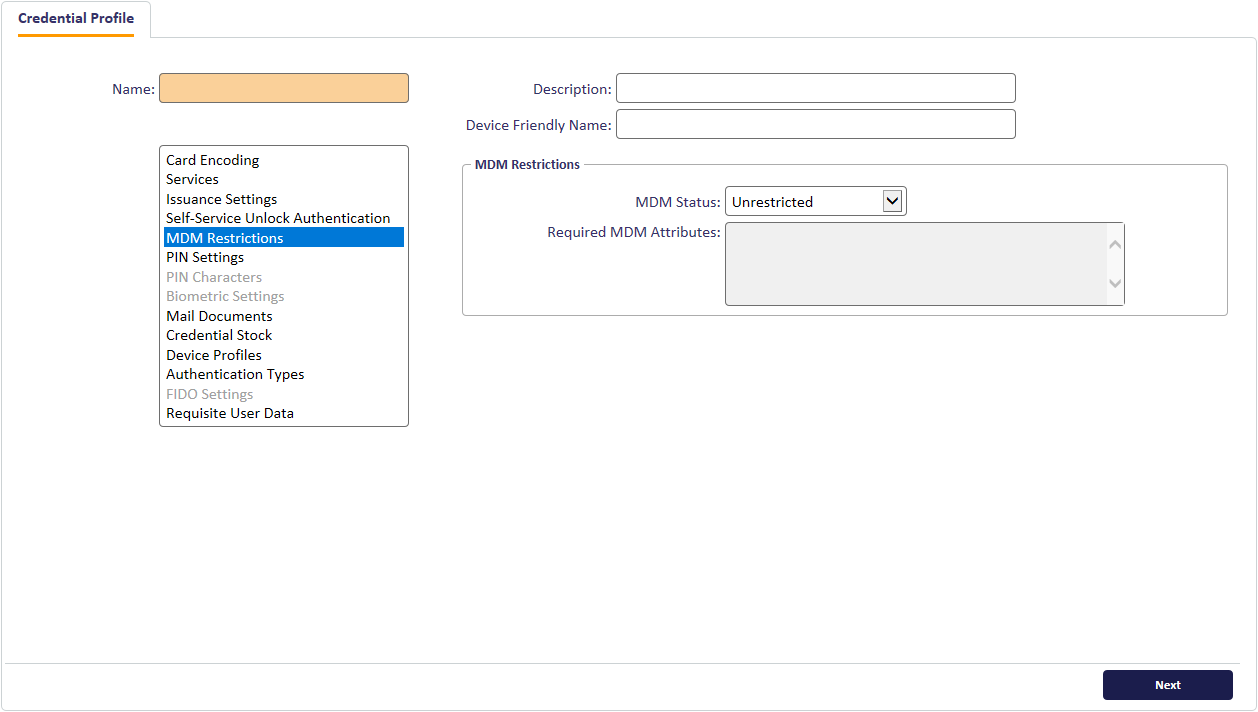
3.11.3 Configuring credential profiles for MDM restrictions
You can configure a credential profile to issue only to devices registered with the MDM, and you can require particular attributes of registered devices as stored in the MDM.
To set the MDM restrictions:
-
From the Configuration category, select Credential Profiles.
You can also launch this workflow from the Credential Configuration section of the More category in the MyID Operator Client. See the Using Credential Configuration workflows section in the MyID Operator Client guide for details.
-
Create a new credential profile or modify an existing one.
-
In the Card Encoding section, make sure both Identity Agent and Derived Credential are selected.
The MDM Restrictions section of the credential profile appears only when you have selected both Identity Agent and Derived Credential.
-
Select the MDM Restrictions section.

-
Set the following options:
-
MDM Status – Select one of the following:
-
Unrestricted – MyID does not carry out any checks against the MDM at collection.
-
Must be registered – The mobile device must:
-
Have an external mobile ID, and:
Must be present in the connected MDM system.
-
-
Must not be registered – The device must either:
-
Have no external mobile ID registered in MyID, or:
-
Not be found in the connected MDM system.
-
-
-
Required MDM Attributes – If you have set the MDM Status to Must be registered, you can specify any required attributes in the MDM, and MyID checks that the mobile device fulfills these requirements.
Specify the required attributes as:
[field]=[value]
For example:
jailBroken=false
You can specify multiple conditions by separating them with a comma.
Note: For nested JSON attributes, use a dot (.) to separate the components; for example:
platform_info.platform_name=iOS
At collection, the MDM entry for the mobile device must meet all the required conditions.
-
-
Click Next and complete the workflow.